Welcome to my Blog

Creative Glass Art by Jeannie Cox

Thursday, October 27, 2011

Keeping Busy


I have been keeping busy lately, filling some orders and making how-to lampworking videos for YouTube.  I have several new videos online now and more to come soon.  Most of my recent videos are more intermediate/advanced techniques which might take a little practice for beginners.  But, I am also going to add more technique/color-reaction videos that will be more simple so that anybody should be able to use immediately.  I hope that I will be able to give some viewers and aspiring glass artists some tips and tricks to help with their creative processes to make their own cool beads!

Here are links to my last couple videos posted .. . .

This is the bead made in my Feathered Rainbow Tutorial on YouTube at http://www.youtube.com/watch?v=h00_ntA8G7Y
Here is another tutorial on YouTube of on-mandrel implosion flowers.  The bead actually made in the video is the yellow one http://www.youtube.com/watch?v=U_WvTs4Z6CY

This is a 2-part video, so be sure to tune into the second half, too.


And this is a little bunny bead which will be yet another tutorial coming up on YouTube  within the next few days!

Thursday, October 13, 2011

The Scars of a Lampworker


Yes, being a lampworker can be exhilerating, exciting, fun and even exotic to some, but it also has it's risks.  Working with an open flame has it's dangers, but for me, all the cuts and burn scars are well worth it. 
Every scar tells a story, and I am glad to say that I am proud of my scars and that the more scars I build up, the more experience I gain at the torch.

This first scar was my worst burn ever.  It's hard to see, so I have highlighted the area.  The whole side of my hand was burnt from the first knuckle down to my thumb.  I was distracted by my son who came into the studio and ended up putting my hand right in the flame - - duh!  A fresh little burn is right above it and to the left, from a piece of flying glass.  I am surprised this scar is so small since such a large area was burned, but probably just the worst of it scarred up.  I now have a small lighter area there with a dark spot at the bottom.  And, of course, even after being badly burned, I had to finish the bead I was working on!
These are a bunch of little scars I have gotten over the years from little shards of flying glass when rods have shocked when first putting them into the flame.  These are no big deal, some hurt a little, but I just brush them off and keep on torching.

Here's a nice one.  This was a larger piece of shocked glass that flew right into my elbow area.  The piece of glass was triangle shaped so I have a nice triangle scar there now - - pretty cool! 
This is one I got just last week and it's healing up pretty well now.  A hot mandrel fell right between my fingers and both my ring finger and my middle finger were burned, but my ring finger got the worst of it.
And here is my newest wound.  Not from a burn, though.  I was playing with a little boro the other day and have a coffee can of rods I was using. Now that I am back to soft glass, I had the can of rods on the floor by my shelving unit.  Duh!  I walked right into a rod that was sticking out and got a nice gouge on my shin.
I believe scars have a big influence on who we are, whether those scars are visible or not.  And whether you have physical scars or scars of the heart, I hope you are as proud of them as I am.  We all make mistakes, we all slip up sometimes, but the most important thing to do is lift yourself back up and keep on going.  

Flowers For Fall

Been experimenting a little as I am trying to get back into a regular torch routine.  The weather is cooler now here in AZ (as least at night) and whether I have neck pain or not, I have to get back on the torch.

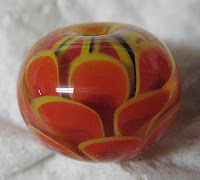
I have been playing with an old flower design I tried years ago - - think they look pretty cool.  I did not invent this design, tho, and I am not sure who did.  I have seen a few beads like these floating around from different
artists.  I am not sure if I make these exactly like others do since I figured this out myself, but they look similar to others I have seen out there.

I am hoping to get some of these online as pendants soon.  I will string them on a headpin with small beads and/or crystals and attach a spring ring so that these could be easily strung onto a corded or chain necklace, a key chain, bookmark, chain-pull, sun-catcher hook, etc.
 I am heading to the chiropractor again this Friday and I am hoping my neck issue begins to improve as it has been, altho too slow for my taste.  As for now, I can only torch for a few hours before the tingling and pain shooting down my arm from my pinched nerve starts being too much to handle.
Wish me luck and I hope you enjoy these floral beads as much as I enjoy making them.  I am also planning on making a set of these, but am trying out different color combos to find my favorites (so far, I really like the orange and aqua one).

Sunday, October 2, 2011

Fall Time in Arizona

   Yep, it is finally fall here in AZ.  I can tell because the tree out in my front yard is shedding it's seeds and leaves like crazy - - we will need to get that cleaned up soon before we are fined by the dang HOA.  I hate HOAs, can't wait until we can get out of this house and into real private property!
   Anyway, the weather has been nicer during the days here, altho it has still been hovering around 100 on some recent days.  Since the nicer weather is here, I have been really aching to torch.  The only thing holding me up is my darn neck!  It's been acting up again, shooting pain and tingles down my right arm which causes a big problem if I try to torch, even for short periods of time.  You would think going to the chiropractor for the last 2 years would of helped it by now - it worries me at times.
   I did finally get onto the torch last night for an hour or so.  I picked up the boro again, trying to get some good color out of it in small experiments.  It was hit or miss with getting any color out.  I really think I need to set up my old National Blow Pipe for some good heat - my minor just doesn't want to do it, especially on a oxycon.
   And wouldn't you know it - a dang hot mandrel slid right between my fingers and gave me a nice little burn and blister.  I guess that's what I get for trying to force myself back on the torch.  No worries, tho - - I will be back at it soon, pain or not.  I can't stand just sitting around all day, pain or no pain.  I will be back at it soon and hopefully will make some good stuff to show, especially if I go back to my comfort zone - soft glass.

Wednesday, September 14, 2011

Say Hi to My Little Friend, Brainy Bob . . .

 Meet Bob, one of my newest creations which I am going to call The Brainies.  Bob is the first of his kind, but hopefully a girl with pony tails will be joining him soon, along with a dog, bird (bird brain - haha!), cat, bunny, and other people and animals, too!  In the mist of other projects I am working on, like my Dragon Eyes (haven't forgot you Lynn!), I am hoping to fit a few of these guys in the mix.

They will all have over-sized heads (to hold their big brains!) and little bodies - - aren't they cute?


I will also be attempting a steampunk-looking guy of some sort, but not      sure when I will be fitting him in, but he will have goggles, gears and maybe a top hat, we will see.

As you see here, the hole is in the big head, so he will conveniently hang upright when strung on a necklace cord or thin chain.  Hope you like! :0)

Wednesday, September 7, 2011

Convention is sadly over . . .

Well, the 31st annual CopperCon Convention is now over.  We had a great time this year!  My DH won the short story contest and received a nice plaque, a ribbon and $40.00 in certificates for a local bookstore.  How nice!
Also, just chatting with all the other vendors and the attendees is always a lot of fun.  And they have so many interesting lectures, readings and discussions at these events, there is almost always something for everyone to enjoy.  My DH loves to attend all the writing based lectures and I enjoy the more interactive, fun groupings.  I attended a really interesting presentation by Debe Branning, an MVD Ghostchaser, about graveyards of Arizona.  Very interesting stories were told and also some nice gravestone pictures of many of the famous people who are buried around Arizona.  I love the paranormal and just wish they would have more programming of this sort at these conventions.  I think it would be cool just to have an open forum Ghost Story hour at the event - - that would be cool, and everyone could participate (who had a nice ghost story to tell!).
As always, there were some really great vendors at the event, too.  Lynn and Rich from OctoberArt - - they have almost everything - from jewelry to skulls.  If you want something strange or whimsical, they probably have it (I am amazed at their display - always!).  Then there is Mike from the Peculiar Magpie - he is an artist who creates steampunk and mythos items for collections and costume wear.  He creates cool weapons, masks, watches, goggles, even has an old-time phone that really works, so cool!  And Jessica Feinberg from Artlair - she is an amazing artists who sells her prints in all forms - bookmarks, posters, buttons, etc.  She draws and paints neat dragons, Dr. Who items, Cthulus, characters, wolves, etc (I got a print of her Steampunk dragon head that's on her webpage - cool!).  She even will take on-the-spot orders at conventions.  There was also Stacia from Infinite Frequencies had some really nice fused glass pendants and earrings (she is a 5th grade teacher) and then a couple of guys with neat weaponry and chainmail items along with some lovely ladies selling beautiful stone jewelry and neat artwork and of course, books and books and books.
We were also lucky enough to have our booth right next to the author's signing table, so it was nice to interact with some of the wonderful authors that came to the convention.
Next year's theme will be Year of the Dragon - - can't wait!

Thursday, September 1, 2011

Vampires, Werewolves and Demons, Oh My!

Getting ready for the CopperCon Sci-Fi Convention this weekend.  To go along with my fangs, Chlulu items and space pendants, I made these little demon figurines.
It should be great fun this weekend, can't wait to see what characters stroll by my booth this year.  Can't wait to see some old friends and say hi to some new ones!

Tuesday, August 30, 2011

I Tawt I Taw a Puddy Tat . . .

I never put my mind to ever making a Tweety Bird, but got the opportunity recently when a family member of mine wanted one for their daughter.  It was a challenge, but it was a nice challenge.  I was worried at first if I could actually get a bead to come out looking enough like the famous canary, but by the time I got the cheeks and beak on, I thought it looked pretty close.  Needless to say, I breathed a sigh of relief after the head was complete and only the body and feet had to be added.

I hope this bead is enjoyed and cherished for years and years!

Tuesday, August 23, 2011

Summer is still upon us . . .


The heat still pounds the hard dry grounds of Arizona this summer.  The news states that it is one of the hottest Augusts on record and we are currently still seeing temperatures of 110 or above.
As I am waiting for this incessant heat to subside, I am dreaming of the nearest night in which it will be cool enough for me to get on the torch again for decent periods of time.
In the mean time, I am doodling images to create in glass, preparing myself for some sweaty nights of torching for orders I must complete and going through my current inventory.  I have an upcoming show in less than 2 weeks for a Sci-Fi convention.  These shows are always a lot of fun, and with the table purchase in the showroom, we also get full membership passes in which we could attend any events or lectures they are having - - nice!
If anyone would like more info on the show, it is being held in Avondale, AZ this year - - and I have info and a link on my webpage at www.jeansbeads.com.

Thursday, August 18, 2011

Blogger Sale is still happening . . .


Don't forget!  My Etsy sale is still going on for those of you who see this blog.  Enter BLOGGER20 at the Etsy checkout and receive a 20% discount.  Great discount on beautiful bead sets, pendants, single focal beads and finished jewelry items!

Tuesday, August 9, 2011

Pretty Flowers


   I haven't make flower beads in ages, it seems.  Actually, it's been about 3 or so years, with just an occasional flower order here and there by request.  I wanted to see if I could actually still make them decently since I haven't for so long.

   When I first started working in soft glass, making beautiful flower beads was one of my main goals.  After conquering the design of encase floral bead and also raised floral beads, I started to move onto other techniques and designs.  That, along with the multitude of other artists already making floral beads, I thought it would be good to come up with other designs, totally unique to me.  So, after a few years, I have created Dragon Eye pendants, Dragon Hearts, Faerie Beads, shark teeth, fangs, space pendants, implosion pendants, etc, and have gained various skills and experience along the way.
   So, I decided to try flowers again, making a full circle, and maybe I can come up with a unique flower bead design all of my own.  Who knows??  I will be working on this, among other things, too, and we will see what happens down the road - - I love glass!  So many possibilities . . .

Friday, July 29, 2011

Hemp Bracelet and other Hemp Knots

Working with macrame knotting in jewelry with hemp, or other thread/twine, can be as simple or as complex as the maker wishes.  Below I have a short tut on a bracelet based on the simple knots in my previous post and also have listed some other knot variations.  This can also easily be converted to a necklace by making it longer.
BRACELET 101 - - Use 2 strings, each approximately 5 feet long, folded  with 8-12 inches on short side and make a simple loop knot, leaving an open loop at the top for a clasp.  You could also attach these strings to a clasp finding if you wish.  Clamp down, secure the 2 shorter strings as the center or core strings you will be weaving around.
Make a series of square knots (the combo of forward and backwards "4" knots from my last tut) - the design is up to you. You could add multiple beads to these knots also.  Knot until you have enough knotting done until it will reach about half way around your wrist.
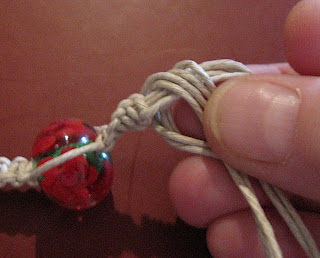
Add beads how you wish.  In this example, I show how to create a multiple bead centerpiece for this bracelet.  Add a main bead through the center 2 threads and add as many smaller beads to each thread on the sides until it would reach all the way around the center bead.
Tie another "4 knot" pull all surrounding beads tightly around the center bead.  Continue your knotting design along the rest of the bracelet.
Here is the finished knotting for this bracelet.
Add a simple loop knot at the end of your bracelet.
Pull each loose string individually to tighten as snugly as possible.
The easiest way to end off this bracelet is to leave about 3 inches of string at the ends and knot 2 separate strands together, cutting off any extra string.  This is simple and also will allow some adjustment for different wrist sizes.
To secure the bracelet on the wrist, simply put one of the loose strand pairs through the loop and knot around your wrist. You could also add a bead to the end, leaving a little wiggle room on the strings and then secure the bracelet by feeding the bead through the loop at the other end, like a toggle clasp.
 OTHER KNOTS:
Half hitch knot - - loop one string around one of the core/center strings, looping it through itself.
Tighten the loop.
Here I am doing the same thing to the other side, but in the opposite direction.  As you can see, the half-hitch knot also will spiral around the center string.
Finished with both strands of half-hitch knots.
Butterfly knot - - this one is exactly the same as making a square knot (forward 4, then backward 4), except you leave a space between the last knot and the new knot you are making.  Here is the first half-square of the square knot.
After adding the second part of the square knot, your knot is now secure and tight.
After securing your square knot tightly, push the knot up your center strings against  your previous knots.  This creates the butterfly knot.
Here is a series of butterfly knots - - you can also add beads along as you wish, as I did on one knot above.
How about 3 strings?  As I said previously, you can make these jewelry pieces more complex.  In this case, I am using 3 strings, side by side to create a wider band.
Take 4 strings from either side (I am starting with the right side, obviously) and make a square knot - - this is the first tie section of the square.
Having the right square not complete, now work with the left 4 strings.  the left 2 strings of the right-side knot will now become the center and outside string of the left-side knot.  Now, make a square knot with these 4 strings.
Completed square knot on the left side.  Keep alternating these knots to create a wider necklace, bracelet or even a belt.  You can also add beads as you wish along the strands.
Multiple alternating square knots on the 3 strands - - beads added to one set of loops for example.
I hope you enjoyed these variations on knotting.  And, it doesn't have to stop there, you can have multiple strands with many alternating knots to create various designs.  Enjoy!


Tuesday, July 26, 2011

Hemptastic Work! How To, Step by Step


I have been working again on an old craft which I first started 30+ years ago.  Making hemp jewelry and key chains, but this time I am using my own lampwork beads to dress up and accent the wonderful weaves of the hemp thread.  It's a fun project to do and you also end up with beautiful jewelry and other functional pieces, like key chains, book marks, chain pulls, etc.
I hope you enjoy this mini-tutorial on how to weave a hemp key chain!
Materials Needed - 2 strings of 2 foot long 1mm hemp, one key ring, one smaller split ring, lampwork bead or beads of your choice, 2 paper clip holders (doesn't matter what size) and one clipboard, stiff board or book cover (like I am using).

Take the 2 cords, line up the ends and fold over about one-third of the hemp so that one side is about twice as long as the other.

Take the hemp at the fold you made and loop that thru the small split ring.  Feed all the hemp ends thru and pull tightly to made a secure knot against the ring.
Secure the 2 shorter strings to your clipboard, stiff cardboard or book cover like I did here.  If you have a clipboard, you can use the clip on the top to secure your ring, then a paper clip at the bottom.  We will be weaving the 2 loose, longer strings around the center, clipped strings.
Make a number four (4) with the left string with the string laying over your clipped-down, center strings.

Take your right string and lay it down over end of the 4, loop it under the clipped center strings and back out the left side of the 4.  This is basically just like tying your shoes, but looping the center strings up in the process.
Pull the knot tight and to the top of your piece at the ring.
Keep making the number 4 loops, pulling tight and trying to use the same tension on each knot to keep them nice and consistent.  Making these number 4's over and over will make the hemp spiral around the center , a neat looking effect!  Note: when the knots loop around the spiral far enough to twist your free strings to opposite sides than you are working, just pull the strings out to the side it wants to go and continue making your "number 4 knots". 
Now, if you make a backwards number 4 knot after your forward 4, that is a square knot.  It is made the same exact way except from the opposite direction.
Making a square knot - - forward 4, then backwards 4, over and over, will make your piece stay straight instead of spiraling around the center strings.  You can mix your spirals and straight sections to create unique patterns in your jewelry.
Adding a bead is easy.  Just unclip the bottom of your center strings and feed the bead through those 2 strings.  You of course will need a bead with a large enough hole to feed the strings through.  After pushing the bead up to the knots previously made, continue knotting under the bead, just as you were before.  Try to keep the strings tight around the bead.  You can string one bead, or many, it's all up to you!
After knotting a few more number 4's, it is time to finish off the key chain.  Detach your piece from your clipboard or hardboard and gather all your strings into one.  Make a loop with all 4 and make a simple loop knot at the bottom, feeding all four strings thru a loop.
Pull and hold the knotted strands as close as possible to your last 4 knot your made and one by one, pull each string to tighten the finishing knot as tightly as possible.  I usually make the rounds with each string 2 or 3 times to make sure it's nice and snug.
Trim your ends of string even and add the key ring at the top and you're done!
I like to unfurl the 4 dangling cords - this helps the knot stay better and also looks better in my opinion,
What is also great about these is they are very versatile.  I use that small split ring because the hemp will get stuck on the key ring ends if you try and put a key directly on it and have to rotate the hemp around the ring.  But also, that little ring also makes it easy to remove from the key ring and put it on a necklace, use it as a chain pull, put it on a bookmark, etc.

Please drop me a comment and let me know if you have any questions or if you liked this mini-tut.
I am also planning on posting a few more pics with different knots and bead designs in the near future - - just waiting on my new hemp supply!