Welcome to my Blog

Creative Glass Art by Jeannie Cox

Friday, July 29, 2011

Hemp Bracelet and other Hemp Knots

Working with macrame knotting in jewelry with hemp, or other thread/twine, can be as simple or as complex as the maker wishes.  Below I have a short tut on a bracelet based on the simple knots in my previous post and also have listed some other knot variations.  This can also easily be converted to a necklace by making it longer.
BRACELET 101 - - Use 2 strings, each approximately 5 feet long, folded  with 8-12 inches on short side and make a simple loop knot, leaving an open loop at the top for a clasp.  You could also attach these strings to a clasp finding if you wish.  Clamp down, secure the 2 shorter strings as the center or core strings you will be weaving around.
Make a series of square knots (the combo of forward and backwards "4" knots from my last tut) - the design is up to you. You could add multiple beads to these knots also.  Knot until you have enough knotting done until it will reach about half way around your wrist.
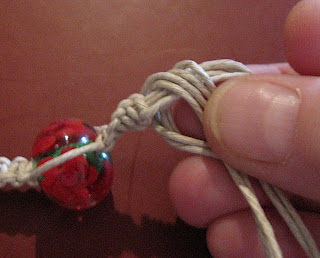
Add beads how you wish.  In this example, I show how to create a multiple bead centerpiece for this bracelet.  Add a main bead through the center 2 threads and add as many smaller beads to each thread on the sides until it would reach all the way around the center bead.
Tie another "4 knot" pull all surrounding beads tightly around the center bead.  Continue your knotting design along the rest of the bracelet.
Here is the finished knotting for this bracelet.
Add a simple loop knot at the end of your bracelet.
Pull each loose string individually to tighten as snugly as possible.
The easiest way to end off this bracelet is to leave about 3 inches of string at the ends and knot 2 separate strands together, cutting off any extra string.  This is simple and also will allow some adjustment for different wrist sizes.
To secure the bracelet on the wrist, simply put one of the loose strand pairs through the loop and knot around your wrist. You could also add a bead to the end, leaving a little wiggle room on the strings and then secure the bracelet by feeding the bead through the loop at the other end, like a toggle clasp.
 OTHER KNOTS:
Half hitch knot - - loop one string around one of the core/center strings, looping it through itself.
Tighten the loop.
Here I am doing the same thing to the other side, but in the opposite direction.  As you can see, the half-hitch knot also will spiral around the center string.
Finished with both strands of half-hitch knots.
Butterfly knot - - this one is exactly the same as making a square knot (forward 4, then backward 4), except you leave a space between the last knot and the new knot you are making.  Here is the first half-square of the square knot.
After adding the second part of the square knot, your knot is now secure and tight.
After securing your square knot tightly, push the knot up your center strings against  your previous knots.  This creates the butterfly knot.
Here is a series of butterfly knots - - you can also add beads along as you wish, as I did on one knot above.
How about 3 strings?  As I said previously, you can make these jewelry pieces more complex.  In this case, I am using 3 strings, side by side to create a wider band.
Take 4 strings from either side (I am starting with the right side, obviously) and make a square knot - - this is the first tie section of the square.
Having the right square not complete, now work with the left 4 strings.  the left 2 strings of the right-side knot will now become the center and outside string of the left-side knot.  Now, make a square knot with these 4 strings.
Completed square knot on the left side.  Keep alternating these knots to create a wider necklace, bracelet or even a belt.  You can also add beads as you wish along the strands.
Multiple alternating square knots on the 3 strands - - beads added to one set of loops for example.
I hope you enjoyed these variations on knotting.  And, it doesn't have to stop there, you can have multiple strands with many alternating knots to create various designs.  Enjoy!


Tuesday, July 26, 2011

Hemptastic Work! How To, Step by Step


I have been working again on an old craft which I first started 30+ years ago.  Making hemp jewelry and key chains, but this time I am using my own lampwork beads to dress up and accent the wonderful weaves of the hemp thread.  It's a fun project to do and you also end up with beautiful jewelry and other functional pieces, like key chains, book marks, chain pulls, etc.
I hope you enjoy this mini-tutorial on how to weave a hemp key chain!
Materials Needed - 2 strings of 2 foot long 1mm hemp, one key ring, one smaller split ring, lampwork bead or beads of your choice, 2 paper clip holders (doesn't matter what size) and one clipboard, stiff board or book cover (like I am using).

Take the 2 cords, line up the ends and fold over about one-third of the hemp so that one side is about twice as long as the other.

Take the hemp at the fold you made and loop that thru the small split ring.  Feed all the hemp ends thru and pull tightly to made a secure knot against the ring.
Secure the 2 shorter strings to your clipboard, stiff cardboard or book cover like I did here.  If you have a clipboard, you can use the clip on the top to secure your ring, then a paper clip at the bottom.  We will be weaving the 2 loose, longer strings around the center, clipped strings.
Make a number four (4) with the left string with the string laying over your clipped-down, center strings.

Take your right string and lay it down over end of the 4, loop it under the clipped center strings and back out the left side of the 4.  This is basically just like tying your shoes, but looping the center strings up in the process.
Pull the knot tight and to the top of your piece at the ring.
Keep making the number 4 loops, pulling tight and trying to use the same tension on each knot to keep them nice and consistent.  Making these number 4's over and over will make the hemp spiral around the center , a neat looking effect!  Note: when the knots loop around the spiral far enough to twist your free strings to opposite sides than you are working, just pull the strings out to the side it wants to go and continue making your "number 4 knots". 
Now, if you make a backwards number 4 knot after your forward 4, that is a square knot.  It is made the same exact way except from the opposite direction.
Making a square knot - - forward 4, then backwards 4, over and over, will make your piece stay straight instead of spiraling around the center strings.  You can mix your spirals and straight sections to create unique patterns in your jewelry.
Adding a bead is easy.  Just unclip the bottom of your center strings and feed the bead through those 2 strings.  You of course will need a bead with a large enough hole to feed the strings through.  After pushing the bead up to the knots previously made, continue knotting under the bead, just as you were before.  Try to keep the strings tight around the bead.  You can string one bead, or many, it's all up to you!
After knotting a few more number 4's, it is time to finish off the key chain.  Detach your piece from your clipboard or hardboard and gather all your strings into one.  Make a loop with all 4 and make a simple loop knot at the bottom, feeding all four strings thru a loop.
Pull and hold the knotted strands as close as possible to your last 4 knot your made and one by one, pull each string to tighten the finishing knot as tightly as possible.  I usually make the rounds with each string 2 or 3 times to make sure it's nice and snug.
Trim your ends of string even and add the key ring at the top and you're done!
I like to unfurl the 4 dangling cords - this helps the knot stay better and also looks better in my opinion,
What is also great about these is they are very versatile.  I use that small split ring because the hemp will get stuck on the key ring ends if you try and put a key directly on it and have to rotate the hemp around the ring.  But also, that little ring also makes it easy to remove from the key ring and put it on a necklace, use it as a chain pull, put it on a bookmark, etc.

Please drop me a comment and let me know if you have any questions or if you liked this mini-tut.
I am also planning on posting a few more pics with different knots and bead designs in the near future - - just waiting on my new hemp supply!

Friday, July 22, 2011

What to Do With the Odd Bead


I have so many beads just lying around my house just collecting dust.  Beads which were left over pieces from a finished jewelry set, one-off's that were either experiments or just from trying something new, single beads from a new glass color I have tested, etc.
I sometimes look at them and think about making a whole set around these lonely little guys or using them in some other way just so they don't go to waste.  By the time I get back to the torch, I have other things in mind and sometimes orders to get done so I rarely make any companions for my "odd-lot" beads.
But today, I have finally used some of those little lonely beads by making hemp key chains.  I had a lot of fun making these.  I used to make macrame hanging pot-holders and such WAY back when I was a teenager, maybe even in grade school.  The same concept and knotting is used in this jewelry and so it was fun to do it again as well as bring back some good childhood memories.
I am hoping to make more of these, along with some bracelets and maybe a necklace or 2.  They will probably be posted in my Etsy store soon.

Wednesday, July 13, 2011

Few New Items up on Etsy . . .

I just listed a few more items up on Etsy.  One of my favorites is a beautiful purple Faerie bead.  It's a nice-sized bead, nearly 1.5" long and would make a stunning pendant either alone or surrounded by some beautiful bead work!
All my beads are made with love and passion, but none more than these faeries.  

Faerie Bead link to Etsy


Also on my site is a new Dragon Eye pendant and a amber, ivory and black Dragon Heart.
 
Don't forget my Blogger discount deal going on now - - save 20% on anything and everything in my Etsy store when you use this discount code with your purchase - - BLOGGER20!

More to come!  Thanks for viewing and have a wonderful day!

Monday, July 11, 2011

Hot Summer Blog Deal!

Hi All,

I am running a special sale on my Etsy site exclusively for those people who view this blog.  This will be for a limited time.  Not sure how long I will keep it going, but it will last through the end of summer, at least.

Any item purchased in my store will reflect a 20% discount if you use this discount code in your checkout process: BLOGGER20

If you have admired a certain bead, bead set or finished product of mine, here is your chance to get one at a great discount.  I have Dragon Eye pendants online, Faerie Beads, hearts, implosions, bead sets - - a wide variety is available now.  I will also be posting many new items in the coming weeks so more is to come!
Jean's Beads on Etsy - - click this link!

Saturday, July 9, 2011

What Inspires You?

So, what does inspire you to create?  I have been asked that question many times over the years, in many different ways.  "How do you come up with these ideas?", "Where did you learn how to make this?", and "How did you create something so unique?", are just some of the questions I have heard over the years.  Well as for learning and creating my own pieces, most come from working with the glass, learning how it flows, moves and melds, then experimenting with different ideas and techniques to get my final products. As for inspiration, that's a different story.

As many artists may tell you, whether they are painters, sculptures or little 'ole glass artists like me, that is a hard question to answer.  The best answer I can honestly come up with is "everywhere"!  I am so in love with the art of melting glass, that just about every day, I see something, think of something or hear something that inspires me to mentally transform an image into a glass bead or sculpture.  Of course, there are so many ideas bouncing around in my brain each day that most don't turn into an actual finished glass piece, but maybe one day,  given enough time. :0)

Many of my ideas come from, where else, my imagination.  I love fantasy and so I created my beautiful Faerie beads and my intense Dragon Eye pendants.  Both came from a visual picture in my mind in which I had also visualized the process of creating the pieces.  After drawings and then practice at the torch, they gradually took shape into the final pieces you can see today.

 Other beads I created "off the cuff" so-to-speak.  Just sitting at the torch one day, had an idea or image and took it from there.  Some of the beads I made were also ideas from friends, just suggesting an idea or asking if I ever created this or that.  I was glad for suggestions from friends because in many cases it pushed me into different directions of creativity and helped open the door to new techniques and skills.  For this I am very grateful, thanks friends!  One of these creations was the shark tooth bead (left) that came from a conversation with a past work-mate of mine.


Of course, nature is always a big inspiration. Trees, mountains, flowers, streams, oceans, sky, etc. All can be transformed into lovely art. I have created various beads with ocean themes, space/moon themes, desert landscapes, trees and mountain, flowers, etc. They are always a joy to make and each one I create has it's own, unique landscape, just like a precious painting. But in this case, it's a painting you can wear!


There are so many other inspirations out there, too.  Seeing a unique painting, the design of a fabric, a children's book, a stuffed animal, a movie scene or even a commercial - - any of these things can put ideas in my head of a new bead or glass art piece.  They come from everywhere and anywhere, at any time.  It is amazing to me still that glass seems to be a constant learning experience, bringing new challenges, new ideas and new techniques all the time.